

 |
 |
drawing spheres |  |
 |
Introduction
This article explains how to draw 3D spheres in the Delphi programming language.An exerciser program is provided and also the complete Delphi project may be downloaded.
(see bottom of this page)
Surprisingly, no difficult math is required: only the Pythagoras lemma and linear functions are needed.
Some controls, small arrows, are added to adjust light position and colors.
The article also describes how these arrows are programmed and how the sliding is accomplished.
Color selection is done by 7 speedbuttons, which are placed in an array and are created at runtime.
fig.1 below is a reduced image of the 3D spheres generator program.
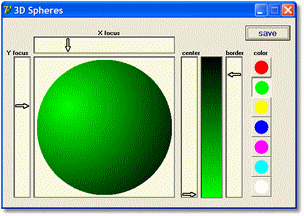
The colors
The colors on the sphere change from the point of highest intensity to the borders.This suggests the 3 dimensional effect.
It is unnatural to change the colors from,say, blue to red. Not the color itself changes but the intensity does.
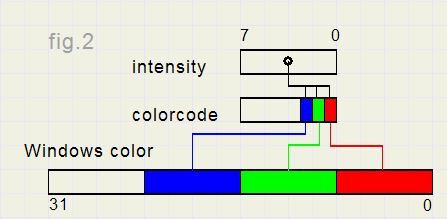
Therefore, at first, we only define the intensity, which ranges from 0 (dark) to 255 (bright).
Next , a 3 bit colorcode defines the colors that participate.
colorcode bit -0- enables red, bit -1- enables green and bit -2- enables blue.
At design time, the colorcode is stored in the tag property of the corresponding speed button.
See figure 2.
Drawing the sphere
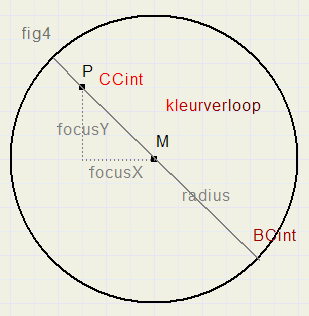
This is done in bitmap Smap. (S - Sphere)All pixels of the bitmap are addressed left to right, top to bottom.
For each pixel (x,y) a check is made to find it's position: inside or outside the circle.
See fig.3

Observe point P(x,y). rx and ry are the horizontal- and vertical distances to the center M.
-
rx := x – centerX
ry := y - centerY
-
MP = sqrt(rx*rx + ry*ry) <= radius.
and also the coordinates on the sphere where light intensity is maximal.
To simplify calculations, the coordinates of the center M are (temporarily) supposed to be (0,0).
Relative to M, focusX and focusY are the coordinates for the maximum intensity:
-
focusX := Xposition – centerX
focusY := Yposition – centerY
If (px,py) is the distance to the focuspoint then:
-
px := rx – focusX
py := ry – focusY
-
d := sqrt(px*px + py*py);
Variables CCint and BCint hold the color intensity (0..255) of focuspoint and border.
A good 3D effect can be obtained by applying a simple linear relation, surprisingly enough.
Per pixellength the intensity changes by the value (max intensity - min.intensity)/(focus - border) so:
-
colorstep := (CCint - BCint-1)/(radius + sqrt(focusX*focusX+focusY*focusY));
-
col := CCint - trunc(d * colorStep);
-
color := colorcode2color(col,colorcode,true);
The scanline[..] property is used twice to get the pointer to pixel[0,0] and to get the increment value
to the pixel below in the bitmap. Avoiding the scanline and pixel[...] statements accellerates painting considerably.
Pixels are written directly in memory.
The slides
The slides are implemented by paintboxes in which the arrows are painted.Xbox controls the horizontal focus position, Ybox the vertical position.
CCbox controls the center-intensity, BCbox the border intensity.
For a slide, following conditions may be noticed:
type TSlidestatus = (stIdle,stOnSpot,stLocked);
var slidestatus : Tslidestatus;
slidestatus = stIdle indicates that no action takes place. The mousepointer is not over an arrow;
slidestatus = stOnSpot indicates that the mousepointer is over an arrow.
slidestatus = stLocked indicates "onSpot"and mouseDown.
Pressing mouseDown when slidestatus = stOnSpot sets slidestatus to stLocked.
This enables mousemoves to change the arrow position.
slidestatus is reset to stIdle after a mouseUp event. The same method is used for all arrows.
For the mouseDown and mouseMove events, methods are separate for each paintbox.
In the source code we notice the variable Offset.
Offset is not strictly necessary here because the arrow is very small.
Fig. 5 below demonstrates the need in case of a larger object.
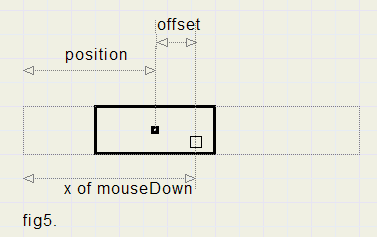
A rectangle can be shifted horizontally.
X is the mouse pointer at a mouseDown event.
By calculating:
-
Offset := X – position
-
X := X – Offset
X then is the position of the object.
Drawing the arrows.
Please refer to figure 6. for drawing a horizontal arrow.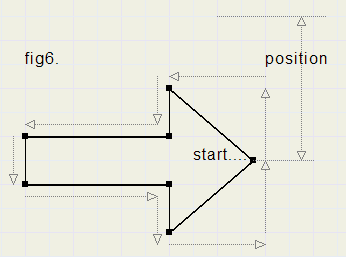
The starting point of the drawing is also the position of the arrow.
Pen movements for X- and Y-directions are stored separately in an array[1..7].
See procedure paintRightArrow for details.
Notice, that the old arrow is first erased before the new arrow is painted.
Of course, a class could be made to program the arrows and their movement. It would certainly be more elegant.
However, in that case it is obvious to add several options which would make the code less convenient to read
and also requires extra testing.
So, I happily leave this exercise to my readers.
The Project
To download the complete Delphi-7 project click [ here ]

