

 |
a non recursive Floodfill algorithm |  |
 |
21-12-2021:
Version 1.1: Corrected error:
(Drawing blocked in Delphi versions 10,11 caused by not initialized clipping rectangle for XBitmaps)
 download tester program
this project uses some of my own components:
Introduction
This is a new floodfill article, including a much faster exerciser program.
The old article, based on the same algorithm, may be found [here] .
Floodfill is a method to fill a random shape with a pattern.
This floodfill method is implemented in my TXBitmap class.
TXBitmap is a Bitmap with several new features such as
-
- 4 drawing levels
- a cliprect
- 16 floodfill patterns
The highest level is 0, the lowest is 3.
Floodfill boundary is formed by pixels having level 0 or 1 (the 2 highest levels).
Pattern drawing is at level 2.
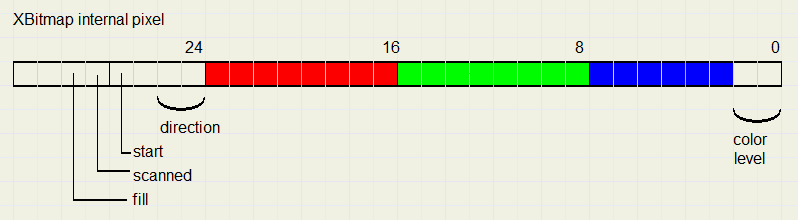
The level of a pixel is stored in blue bits 0,1.
The cliprect is a rectangle on the screen.
Painting outside the cliprect is not possible.
The floodfill algorithm here presented is non recursive.
This is an advantage because, while filling large shapes, stack boundaries cannot be violated.
Below is a reduced picture of the floodfill exerciser at work
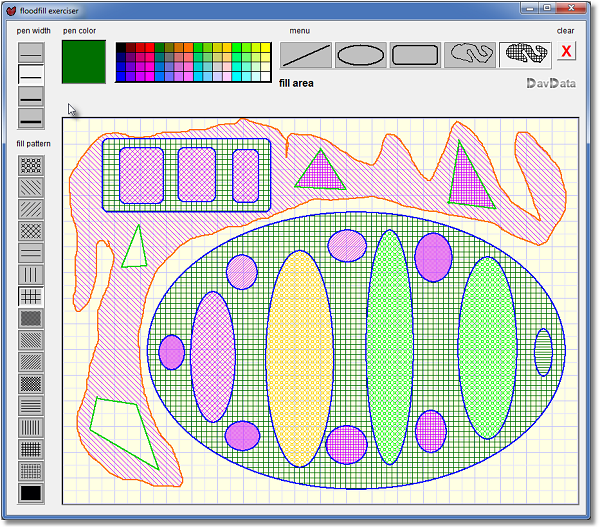
How to use the floodfill exerciser
Click on a menu button to select an operation:
-
- line : draw lines
- ellipse : draw ellipses
- freehand : draw random shapes
- fill : fill an area with the selected pattern
Press left mousebutton, keep pressed and move mousepointer over screen.
To fill, press mousebutton on point to start filling.
Select a pen width, fill color or fill pattern by clicking on the color- ,
pen width- or fill pattern selector.
Tarry's maze algorithm
My floodfill method is based on Tarry's maze algorithm.
In 1895, the mathematician Gaston Tarry published a procedure to escape from a maze.
Mazes were very popular at that time.
Mathematically, a maze may be described by nodes and connections, so by a graph.
A graph is a drawing consisting of points, which may be, or may be not, connected by lines.
The points, or nodes, are road intersections, start- or ending points.
The lines are drawn straight however in reality roads in a maze change direction to confuse the visitor.
Starting at an arbitrary place in the maze, according to Tarry's algorithm,
two distinct signs should be painted along the route
-
1. a sign marking the entrance of a new (not yet visited) node
2. a sign marking a choosen road starting at a node
-
1. a road may not be traversed twice in the same direction
2. the road back to the previous node may only be taken if all other exit roads have been traversed
Starting at A, an exit mark is placed. Arriving at new node B, an entry mark is placed.
Choosing the road to C, again an exit mark is placed as well as an entry mark when entering new node C.
If C has no exit roads, the road back to B is taken. At B, a new route, say to D, is choosen, exit mark placed etc.
The road back from B to A may only be taken if all exit routes from B are traversed.
In this way there is certainty that the exit is found.
But if no exit exists, we will eventually return to the starting point.
But in that case, all nodes have been visited.
Algorithm implementation
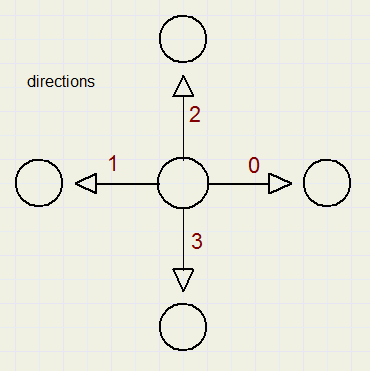
Pixels on a screen may be considered as a maze, see picture below, where adjacent pixels are connected by roads
in horizontal- and vertical directions.
While traversing this maze, for each pixel we need one byte of information
to record the following conditions:
| bit | meaning |
| -01- | direction 0..3 in which pixel was entered |
| -3- | scan started at this pixel |
| -4- | pixel scanned |
| -5- | pixel to be filled |
Direction bits:
| code | direction | previous pixel |
| 00 | right | x := x - 1 |
| 01 | left | x := x + 1 |
| 10 | up | y := y + 1 |
| 11 | down | y := y - 1 |
Notice that the opposite direction is obtained by 'direction xor 1'
The TXBitmap class uses the pf32bit pixel format.
Here, bits 0..7 hold the blue, bits 8..15 the green and bits 16..23 the red intensity.
Bits 24..31 are unused and here we store the scanning information.
The floodfill procedure is made up of the following parts:
1.Marking of the boundaries
The edges of the cliprect are set to $10, the "scanned" status.2.Marking level 0,1 pixels
Pixels within the cliprect which have level 0 or 1 are set to the "scanned" condition.3.Scanning
Mark the starting pixel $38: fill, scanned,start bit.dir is a byte variable holding the scan direction.
Set dir := 0 and proceed to nextpixel
nextpixel
-
dir = 0 : x+1
dir = 1 : x-1
dir = 2 : y-1
dir = 3 : y+1
not scanned : set scanned, set fill, set entry direction (dir)
if dir = 1: goto nextpixel
if dir <> 1 : dir := 0
(if going left, continue left, else go right)
previouspixel
-
dir = 0 : x-1
dir = 1 : x+1
dir = 2 : y+1
dir = 3 : y-1
if dir = entry direction xor 1 : dir + 1
if dir < 4 goto nextpixel
if dir > 3 : dir := entry direction of pixel xor 1, goto previuous pixel
if startpixel: goto fill
fill
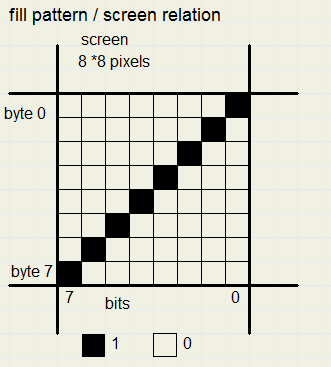
The fill pattern is stored before in fillmap : array[0..7] of byte
This is done when selecting the fill pattern.
A pattern is 8 * 8 bits.
A bit set enables the writing of the brush color.
The 8 bits in a byte of the fill pattern correspond with 8 horizontal screen pixels.
If the pattern bit is set, the screen pixel may be written.
The 8 bytes in the pattern correspond to 8 vertical pixels of the screen.
The screen x and y addresses are anded by $7 for comparison with the fill pattern.
See picture below
The screen cliprect area is scanned for pixels having the fill bit set.
If so, the corresponding bit in the pattern is checked.
If set, the brush color is written.
In any case however, the bits 24..31 of the pixel are reset.
the Project
This Floodfill Delpi-7 project has one form and 3 units:-
form1,unit1 : controls, events, paintbox
unit2 : the drawing procedures for the lines, ellipses and freedraw
unit3 : the XBitmap class with the floodfill and pattern generator procedures
This bypasses Windows calls and saves considerable time.
For details, please refer to the source code:

